Anyway, now that I have made it pretty clear what a nice and approachable guy Louis was as well as being a phenomenal photographer, lets quickly talk about the images in this blog post.
It’s a sad reality for me that in the day to day photography I do lately is pretty safe. Safe in the fact that I have learned what works well to get good images with the minimum of fuss. I have discussed this in a previous blog post for those who really care to remember. The point of the matter is that when the pressure is on and the client has their money on the table; right there and then is not a good idea to try and get all creative. Just deliver what the client wants – thanks very much and have a nice day.
Therefore, invariably I tend to live in [A] Aperture Priority mode on all of my cameras. I set the aperture to the effect I wish to achieve and then let the camera figure out the actual exposure all by itself. And it usually does a reasonable job. So with this in mind it was really refreshing when the very first thing Louis told us to do was to put our cameras into manual mode and leave them there. Ok.
Oh yeah, I should point out that each and every image in this blog post is how it was straight out of the camera. No Photoshop or any sort of manipulation other than to apply the watermark and reduce the file size for the web. So what I want to do now is just give you all a quick run-down on these images, how they were taken and what/where the light source was.
So, the first image in this blog shows Jess from Chadwick’s up against one of the tall pine trees on the grounds of UWA. I love the way the natural light looks on Jess’ perfect skin in this shot. So, do you think it is over exposed? I thought so too, but now think about it again. What really is over-exposure? Am I loosing any image detail in Jess’ skin, eyes or face? No. Is the background blown out slightly? Yes. So what – it’s all about the effect that you are trying to achieve right? This shot was taken with my 70-200mm f/2.8 telephoto at 200mm and f/2.8, 1/200th second shutter at ISO400 with 100% natural daylight. This was two full stops over what the camera thought was “correct exposure”. There are no reflectors or foam core panels in this shot. I love the way the image appears to have had the diffuse glow / Gaussian Blur filter treatment in Photoshop. Not the case folks. Like I said, this was straight out of the camera. The gold hue to the image was achieved by manually setting the white balance on the camera to [Cloudy].
The next image shows Terrance (forgive me if I have your name wrong – can someone help me out here?) in one of the hallways in the building we were in. He is standing directly across from an open window. This image was taken once again with the 70-200mm f/2.8 telephoto at 155mm, handheld, f/2.8, 1/40th second at ISO200. I like the way here that the white wall he is leaning against is filling in the all of the shadows on the right side of his face, and how the background is nicely blurred by the bokeh of the lens.
 Moving right along, this is Jess back out side against the exterior of the building. Can you tell what the light source is in this image? a) The sun or b) artificial flash? The answer is ‘b’! I purposefully set the white balance on the camera to cloudy in this shot to make it look like late afternoon sun. This shot was taken at 2pm. This time I used my 24-70mm f/2.8 lens at f/2.8 and 70mm, 1/250th second shutter at ISO200. The camera was set to +1 stop over-exposure according to the in-built meter and the flash was set to -1 stop under-exposure. The flash was a Nikon SB-900 shooting through one of Louis’ Lastolite Softboxes and was being triggered by another SB-900 on my camera in i-TTL mode. The whole soft box/flash assembly was placed on a monopod and held up about 1 ½ metres above Jess’ head. I love the way the light is particularly soft on Jess and also the overall warmth of the image made simply by making the aforementioned white balance change. Cool.
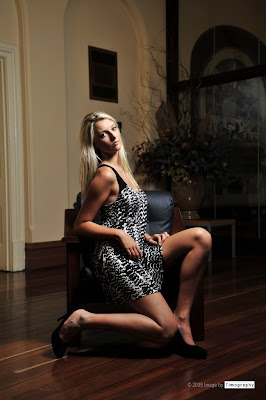
 Ok, almost done. And thanks for reading this far down the page. Good for you! We were running out of time so we headed back inside for a change of scenery. Also because of the time issue (we were shooting in groups of four and only had limited time each to photograph Jess) we stuck with the flash/soft box/monopod arrangement as it was working so well. I am not really happy with how Jess’ hair is all bunched up against the railing here – alas I did not notice that when I took the shot. This again was my 24-70mm f/2.8 lens at 46mm, f/4.0 at 1/100th second shutter speed at ISO1000. The camera was set to -1/3 stop under expose according to the inbuilt meter and the flash was set to -1 stop. I originally took the shot at ISO200 but the background was too dark for my liking. So the shutter and aperture and flash were all left alone and I only upped the ISO.
Oh yeah, I think it relevant to clarify it here, but you may have noticed that I have been quoting camera over/under exposure “according to the inbuilt meter”. This is for very good reason. When you are shooting in Aperture (AP) or Shutter (SP) priority modes, if you wish to shift the whole exposure up or down you can use the exposure compensation function on your camera which automatically shifts the shutter speed up or down if you are in AP mode or the aperture up and down if you are in SP mode. So clearly; if you have everything locked down in manual mode this exposure compensation is NOT going to work. The camera will let you make the exposure compensation adjustment with the controls but it does not have any effect on your aperture and shutter speeds that have already been locked in and will therefore not affect the image. So you have to do exposure compensation manually also by adjusting your aperture (for controlling the amount of flash in your image) or shutter speed (for controlling the amount of ambient light getting into the image). Simple!
 Ok, last one. I had actually finished my allocated time-slots with Jess but this was a bit of an opportunistic shot! One of my fellow workshop attendees was struggling with her manual camera settings, so while Louis gave her a hand I made a couple of posing changes to Jess and managed to snap this shot. I’m glad I did, it’s my favourite from the whole day. I used my 70-200mm f/2.8 lens at 85mm, f/3.5 at 1/100th second shutter speed – handheld, and ISO 320. In hindsight the background is a little distracting and I could have dropped the ISO down to 100ish… but I LOVE the light on Jess’ face in this image. Gorgeous.
So, there you go. Thanks again to Louis and his wife for putting on a fantastic day – and one that I will remember for some time to come.
Ok, well I think that well and truly wraps up this blog post. Take care everyone and I’ll talk to you all soon!


